
These homemade eggless sweet buns are super difficult to resist!! They are soft, fluffy and delicious that makes a perfect snack, breakfast or meal. Nothing can beat freshly made homemade sweet buns. They are quick and easy to make but you need to be careful with the measurements!
Believe me once you start baking buns at home you will stop buying from market. These buns tend to melt in mouth and would not last long! This a winner recipe with kids too J
Starting with the recipe!
Ingredieants ( For 10-12 Buns )
- All Purpose Flour – 2 ½ cup ( 1 cup = 250ml )
- Vegetable oil / Canola oil – 2 tbs
- Butter – 2 tbs
Keep little extra butter for brushing the buns.
- Sugar – 4 tbs
- Salt – ½ tb
- Baking powder – ½ tb
- Sesame seeds – 1 tb (as per your choice)
- Chia seeds – 1 tb (as per your choice)
- Instant Yeast or Active Dry Yeast – 2 tbs
Yeast Preparation ingredients ( If using Active Dry Yeast )
- Active Dry Yeast – 2 tbs
- Water – 2 ½ tbs
- Milk – 2 tbs
Keep little extra milk as we would need them to brush the buns.
- Sugar – 4 tbs
In total only 4 tbs sugar will be added in the recipe. But you can add more if you want the buns to be sweeter.
Method
Start with activating the yeast if using “Active Dry Yeast”
Warm up the milk for a few seconds. Do not boil the milk, it should just feel lukewarm. Add the measured tablespoons of active dry yeast, water, milk and sugar to it. Whisk it well.
Let it sit for 5-10 minutes and it will start looking like a thick creamy paste. In another 5 minutes it will get all bubbly and foamy. It can take a little longer at times. The end result for yeast should be thick, frothy and “almost” doubled in size.
This process is called proofing yeast. It is done to make sure active dry yeast (not instant yeast) is alive and active. If by any chance the yeast does not froth or bubble even after 30 minutes of wait time, you need to discard the mixture and start afresh. You cannot make buns without successfully going through this process.
- If you’re using “Instant Yeast” like me – it needs to be added to the recipe directly. No proofing is required.
Coming to the next step we need to prepare dough for the buns.
In a bowl combine all-purpose flour with salt and baking powder, and mix it well. You can sieve all three together to avoid any lumps. It is a tried and tested method to make sure no lumps-bumps-knots are left in the mix! Make a well in the middle of the flour and combine the proofed yeast and gradually add water and milk to it. Further mix butter and oil to knead flour into a smooth, soft pliable dough. Remove the dough from the bowl; dust the work surface with flour and start kneading for at least 7-10 minutes until the dough forms an elastic consistency. Kneading enhances dough elasticity and gluten formation. If not done well the buns will come out dense. If by any chance the dough feels sticky, don’t panic! Consider adding more flour to it.
- Now, if you are using instant yeast then unlike active dry yeast it doesn’t needs proofing. Instant yeast will be added straight to the dry ingredients and the results will be the same.
Once the dough is kneaded, place it back in the bowl and cover it with a wet towel. Set it aside in a warm place and let it rise until it doubles in size. It should take around 1 hour or additional 30 minutes to rise. To check the dough if it’s ready for the next step, poke a finger in the dough to make an indent/hole. If the hole remains and doesn’t bounce back that means it is ready. You will see how dough is all airy and puffed up. So the next step is to punch the air out of the dough with your knuckles. Then remove it from the bowl and knead it on the dusted work surface for another 5- 7 minutes to a smooth and rounded dough. This step is important to bake lighter buns.
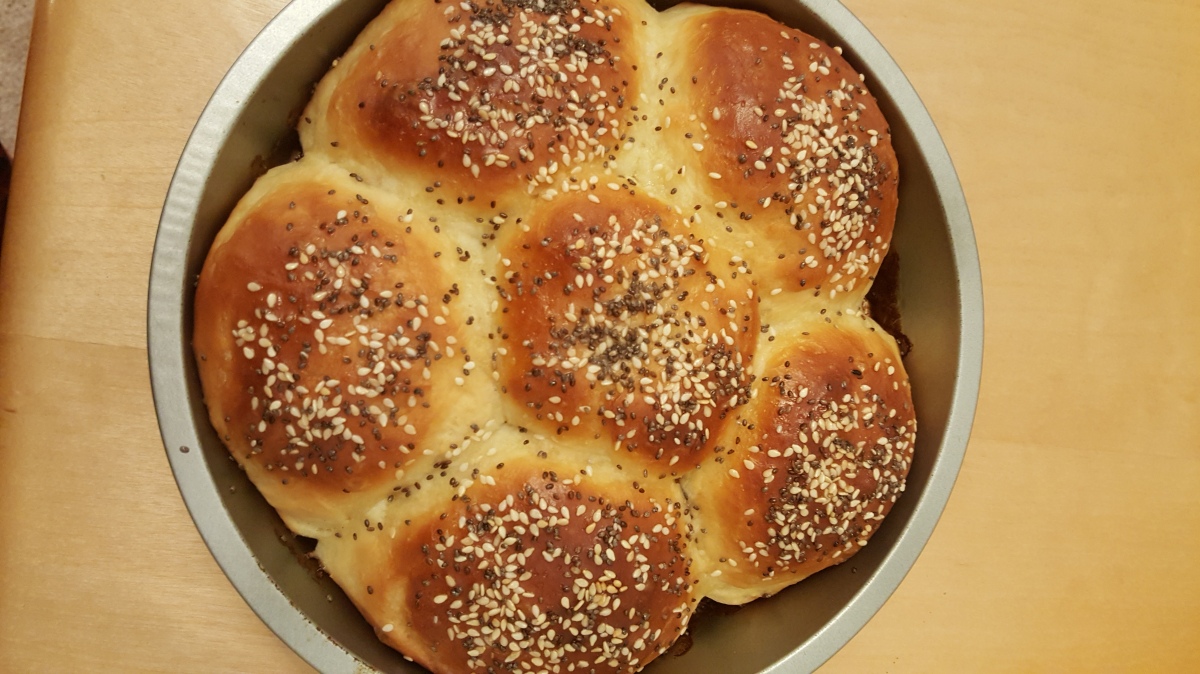
Now shape the dough into a log and divide them equally into 10-12 dough balls. Take one piece of the dough and roll it with the palms of your hand into a ball. Roll all of them and place the buns onto the pre-lined/ butter or oil brushed – baking tray or any oven resistant dish. Keep some distance between the dough balls. Cover them once more with the wet towel, and let them rise again for about 30 minutes to an hour. You will see they’re sticking to each other as they rise but that is how it is supposed to be.
- You have to give sufficient time for the dough to rise otherwise you will get dense buns.
While you’re waiting for the dough to rise, pre-heat the oven to 170ºC – 200º C or 325ºF – 400ºF
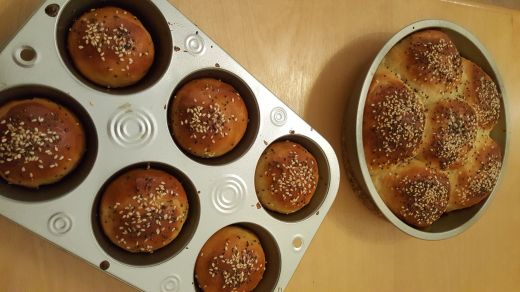
Now brush the buns with milk and butter. Sprinkle sesame and chia seeds on the buns and bake them for 10 -12 minutes or until light brown from the top. You will see that the top of the bun is hard but still soft when pressed lightly. Apply butter to the freshly baked sweet buns and it will soften the top giving it a shine and fragrance. Run a butter knife around the edges and toss them out of the baking pan. Let the bottom of the buns dry out completely. This is important to do because due to heat condensation buns will turn moist and wet at the base. These buns will separate super easily. Our sweet buns are ready to melt in your mouth!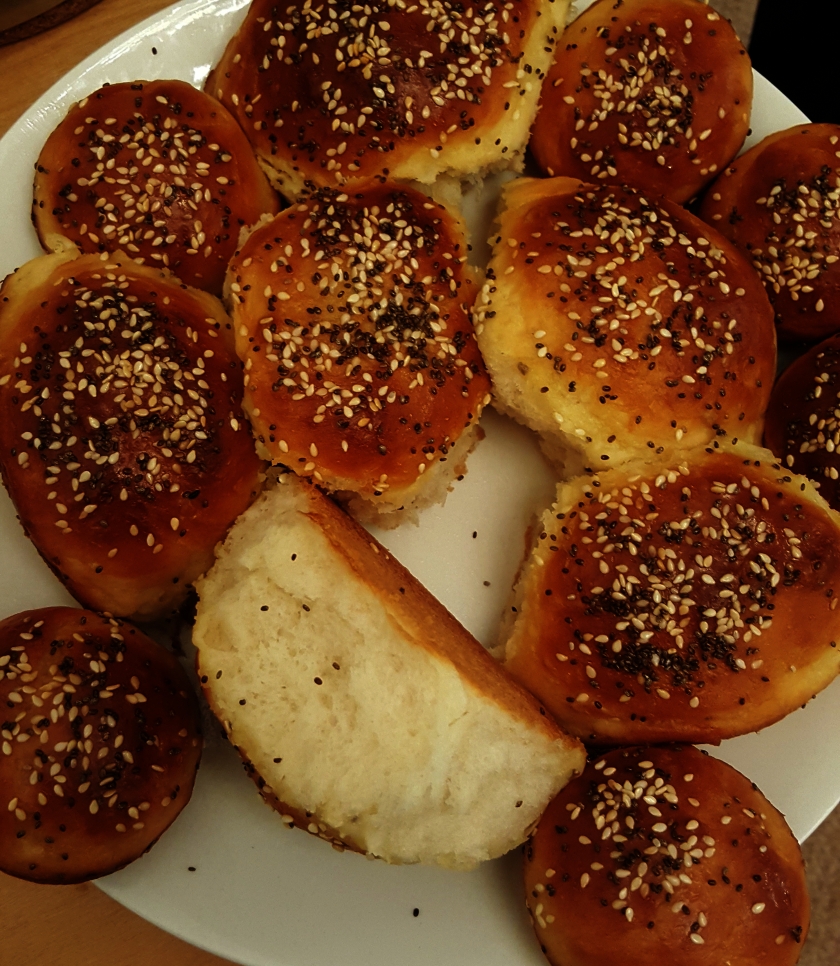
- If you want soft buns make sure to preheat the oven and keep the tray at the middle rack. If your buns don’t brown in the given time frame, put them on broil (place the tray on top rack- closest to the heating rod) for 30 seconds to a minute max and remove them immediately. We don’t want burned sesame and chia seeds and also overcooking will harden the buns.
xoxo
Tripti
